I’ve been exploring the concepts of Open Authorization (OAuth) lately, and I noticed that while there’s a lot of information out there, it can sometimes be a bit confusing or scattered. I felt there were some gaps in understanding—both for myself and in the way the topic is commonly explained. So, I decided to put together this blog to share my take on OAuth concepts and some common test cases. It’s been a fun digging into how OAuth works, and I’ve tried to break things down in a way that’s simple and easy to follow. I hope you find it helpful and maybe even a little interesting too!

Chapter 1:
How to use this document?
This document provides a foundational overview of Open Authorization (OAuth), explaining its core concepts, how it functions, and presents pentesting test cases. Visual figures and screenshots are included wherever applicable to aid understanding.
Please note that this document is intended as an introduction. Readers are encouraged to conduct further research to stay updated on the latest developments and potential vulnerabilities in OAuth. Relevant resources for continued learning and hands-on practice have been included for reference at the end.
Chapter 2:
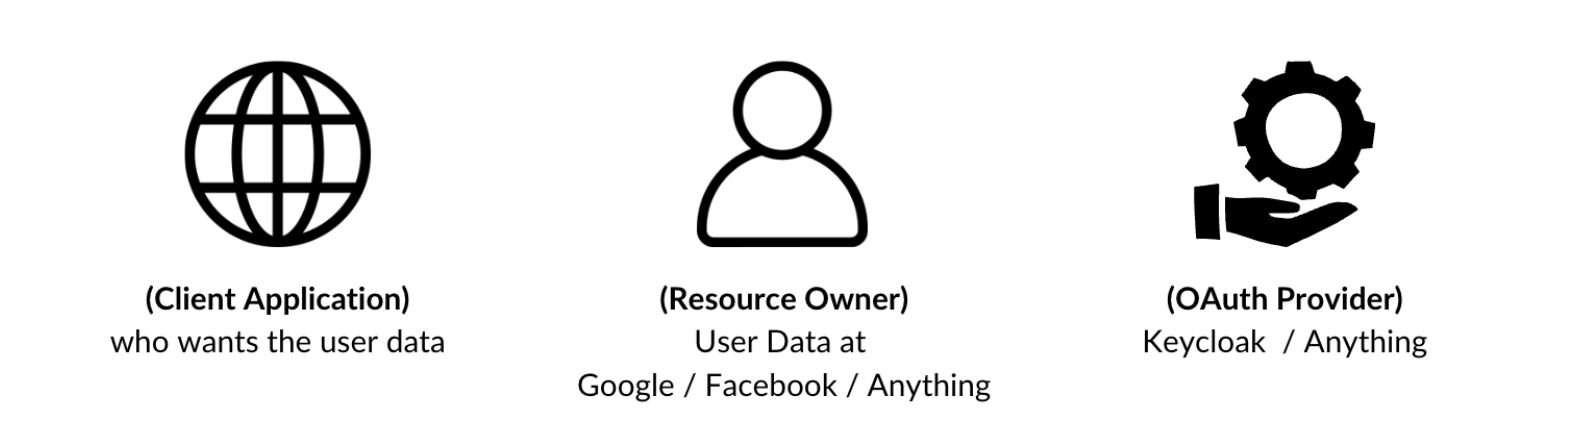
Introduction
First of all, what does OAuth stand for? It stands for “Open Authorization”, which is an open standard authorization protocol. In other words, it allows a third party to delegate as the user and retrieve limited information without password sharing.
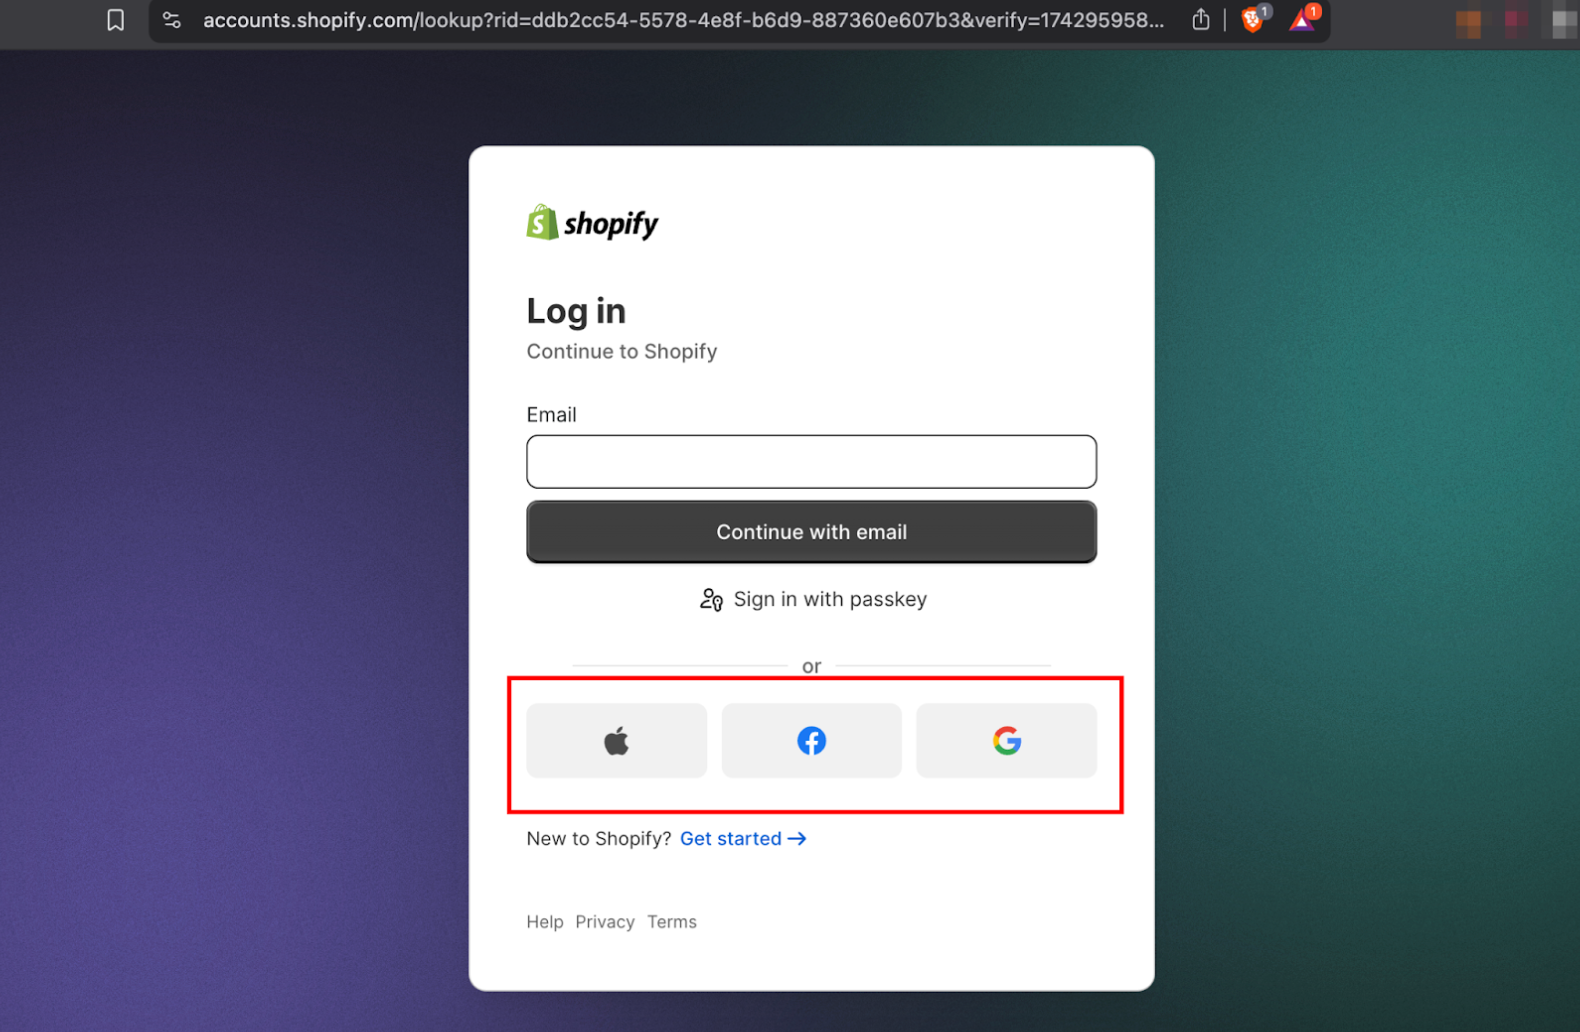
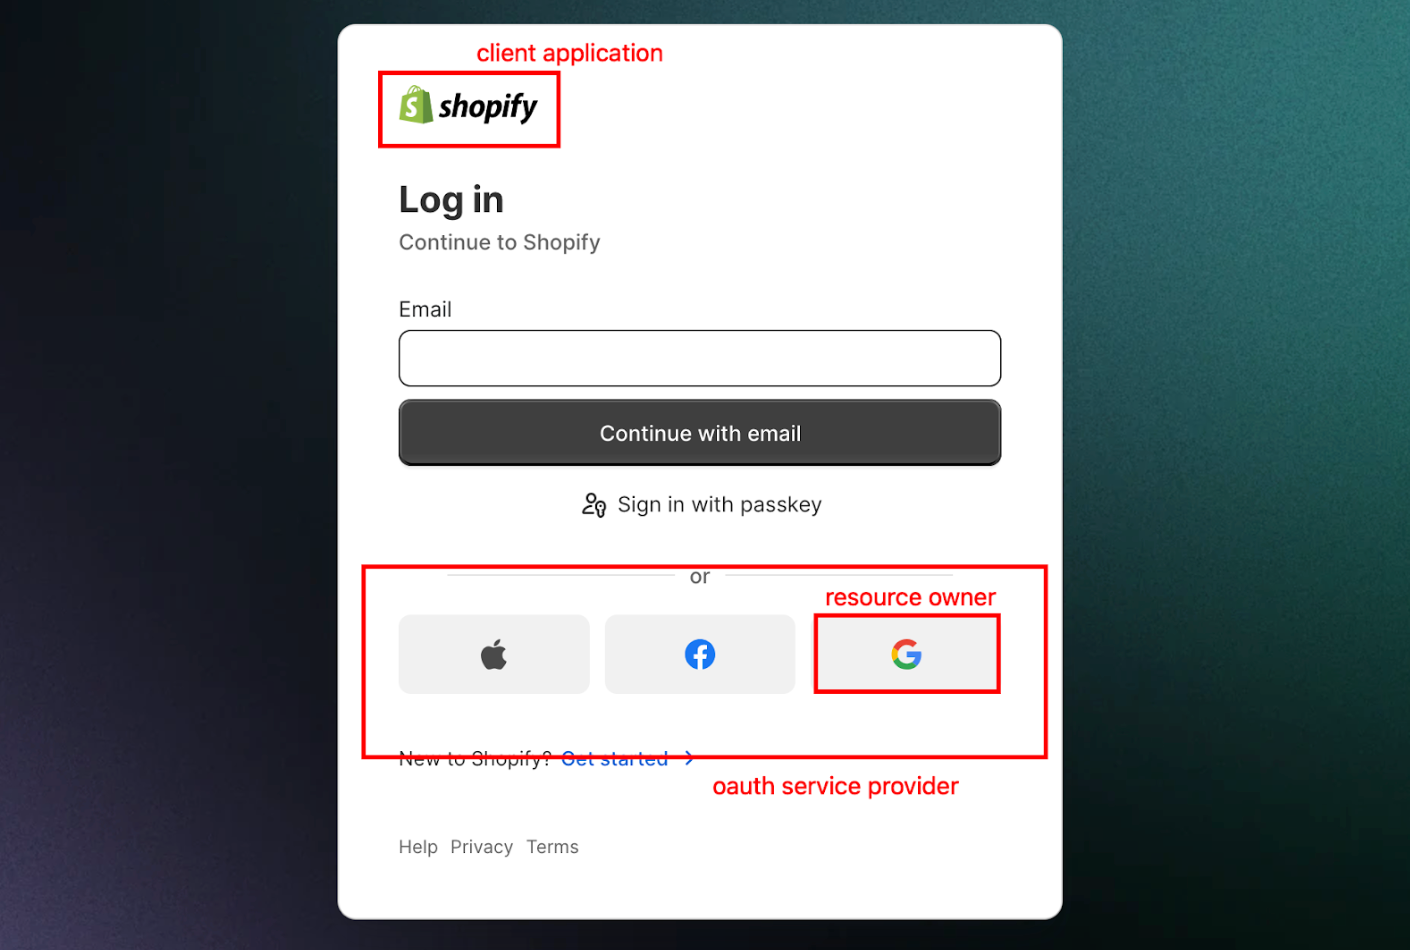
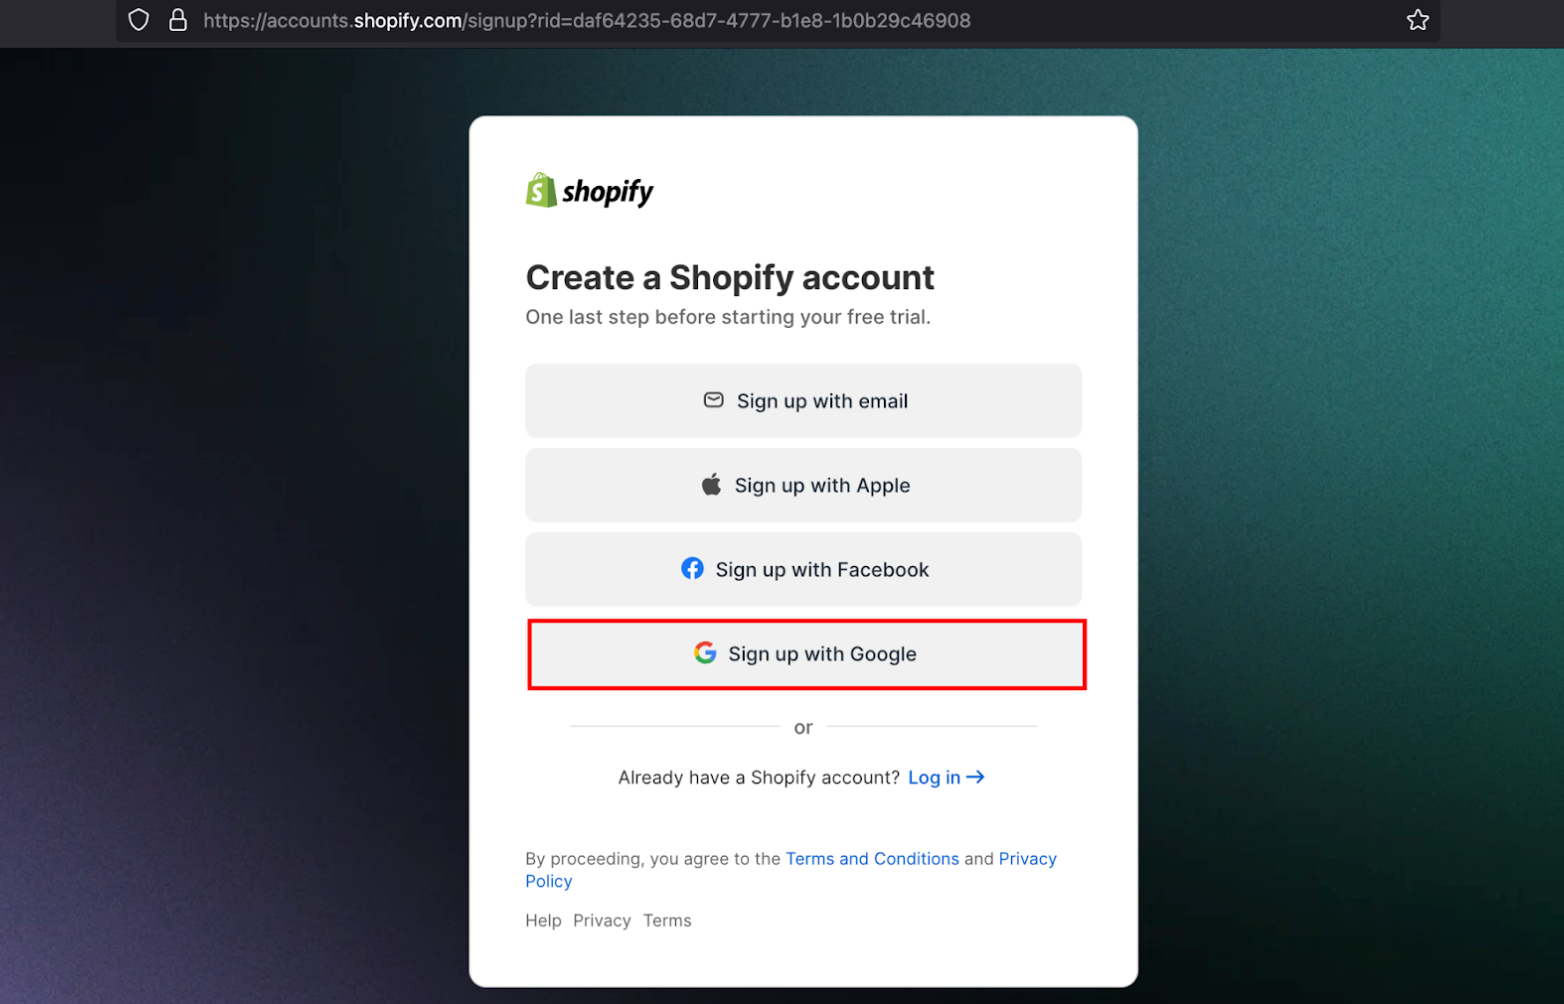
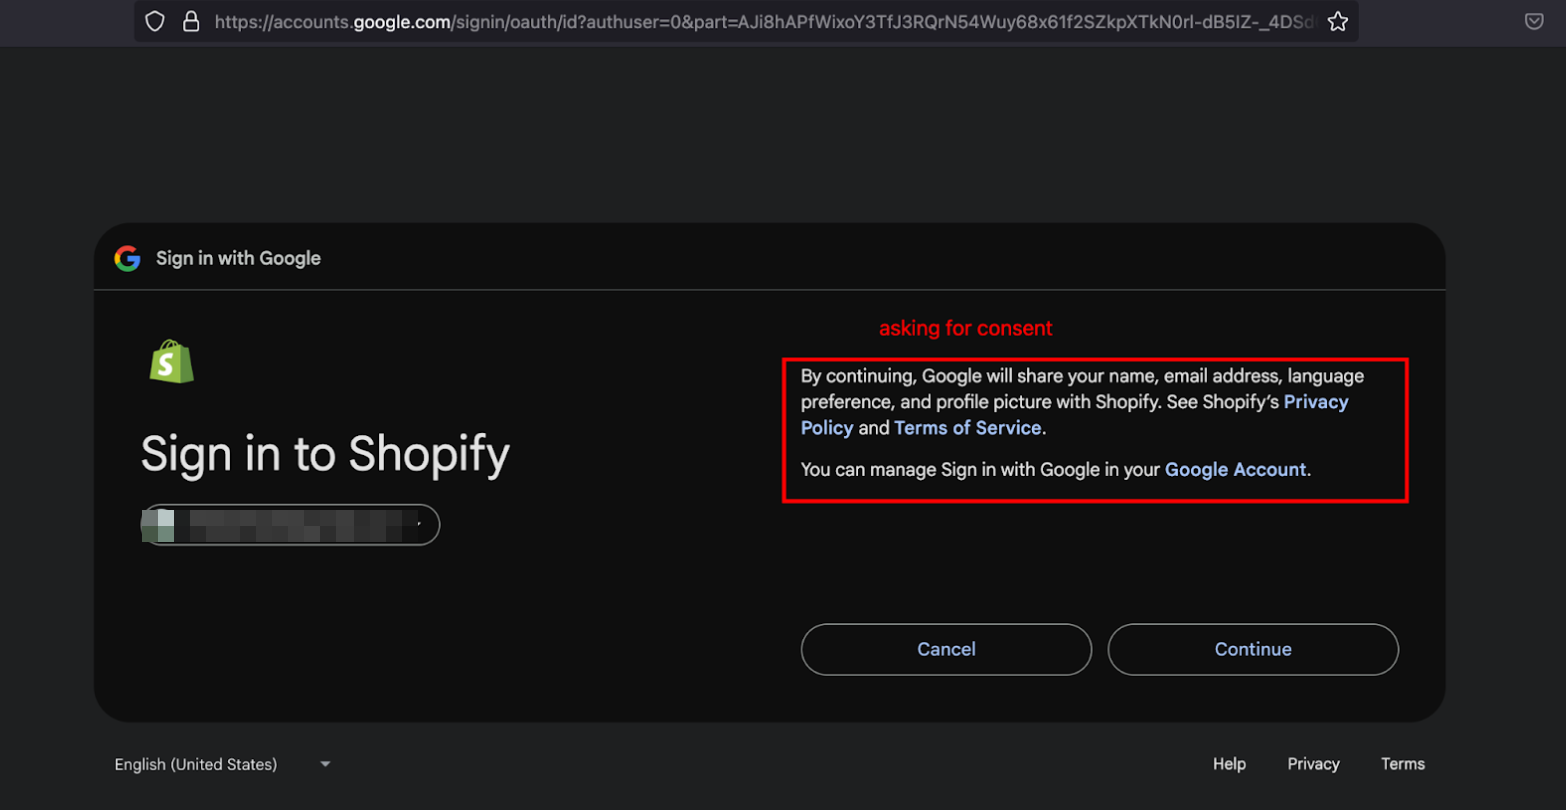
For instance the below screenshot shows how “OAuth” implementation generally looks on the websites.
There are four different versions of OAuth: 1.0 and 1.0a, which are outdated and will not be covered here; 2.0, which is widely used today; and 2.1, for which only a draft has been released and is coming soon.
In this discussion, we will focus only on OAuth 2.0, as it is the current industry standard for authorization.
Here’s a quick breakdown:
- OAuth 1.0 and 1.0a had complex implementation due to cryptographic requirements and faced security issues, leading to their deprecation.
- OAuth 2.0 is the most widely used version today, offering a simpler implementation by eliminating cryptographic signatures and relying on HTTPS for security. It also introduces enhanced security features.
- OAuth 2.1 is an upcoming update to OAuth 2.0, with only a draft released so far. It removes outdated and vulnerable flows while enforcing best security practices. The draft is still under development.
Chapter 3:
Understanding the working (OAuth 2.0)
Before diving into the technical details, let’s first understand the OAuth flow through a practical example.
Suppose UserA wants to sign up on SiteA using their Google account. When UserA selects the Google/Gmail option to connect with SiteA, they are redirected to Google’s authentication page, where they enter their credentials. Once Google validates the credentials and requests UserA’s consent to share the necessary information, UserA is redirected back to SiteA, now logged in, with some personal details (such as name and email) already populated.
Now, let’s look at what happens behind the scenes. We will also practically explore this concept using Shopify as an example.
Now, technically, when we click the Google/Facebook/Anything option on SiteA, SiteA sends an authorization request to the OAuth provider.
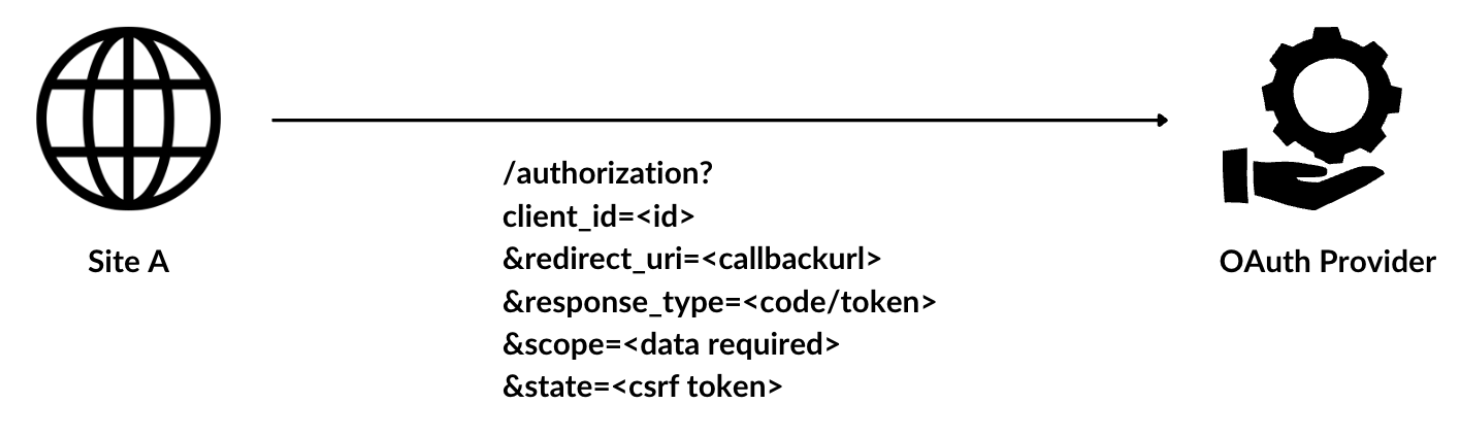
[1] This is a crucial request to understand in the OAuth process. It includes several key parameters, along with a few more that may be optional or specific to the OAuth provider:
- client_id: A unique identifier for SiteA, obtained when it registers with the OAuth provider.
- redirect_uri: The URL where the user is redirected after completing the process.
- response_type: Determines the type of response expected. This is where grant types come into play. For now, just understand the meaning of “response_type=code”
- This process is known as the Authorization Code Grant Type, where SiteA first receives an authorization code. SiteA then exchanges this code for an access token, which is used to retrieve the required user information.
- scope: Defines the specific data the application requests access to. Common values include “email”, “profile”, or “phone”, depending on what information is needed.
- If “openid” is included, it indicates that OAuth is being used for authentication via OpenID Connect (OIDC), which extends OAuth 2.0 to support authentication alongside authorization.
- state: A randomly generated token attached to the authorization request. When the user is redirected to the callback URL (redirect URI), the state value is included as a query parameter. This ensures the request is legitimate and not from an attacker or bot.
- There are a few more parameters attached depending on the grant type and its additional features.
- For instance, there is parameter will allow you to get the access token on the callback request body rather than the query parameter
- If you’re only reading about a specific grant type, make sure to check the details in the “More About the Grant Types” section.
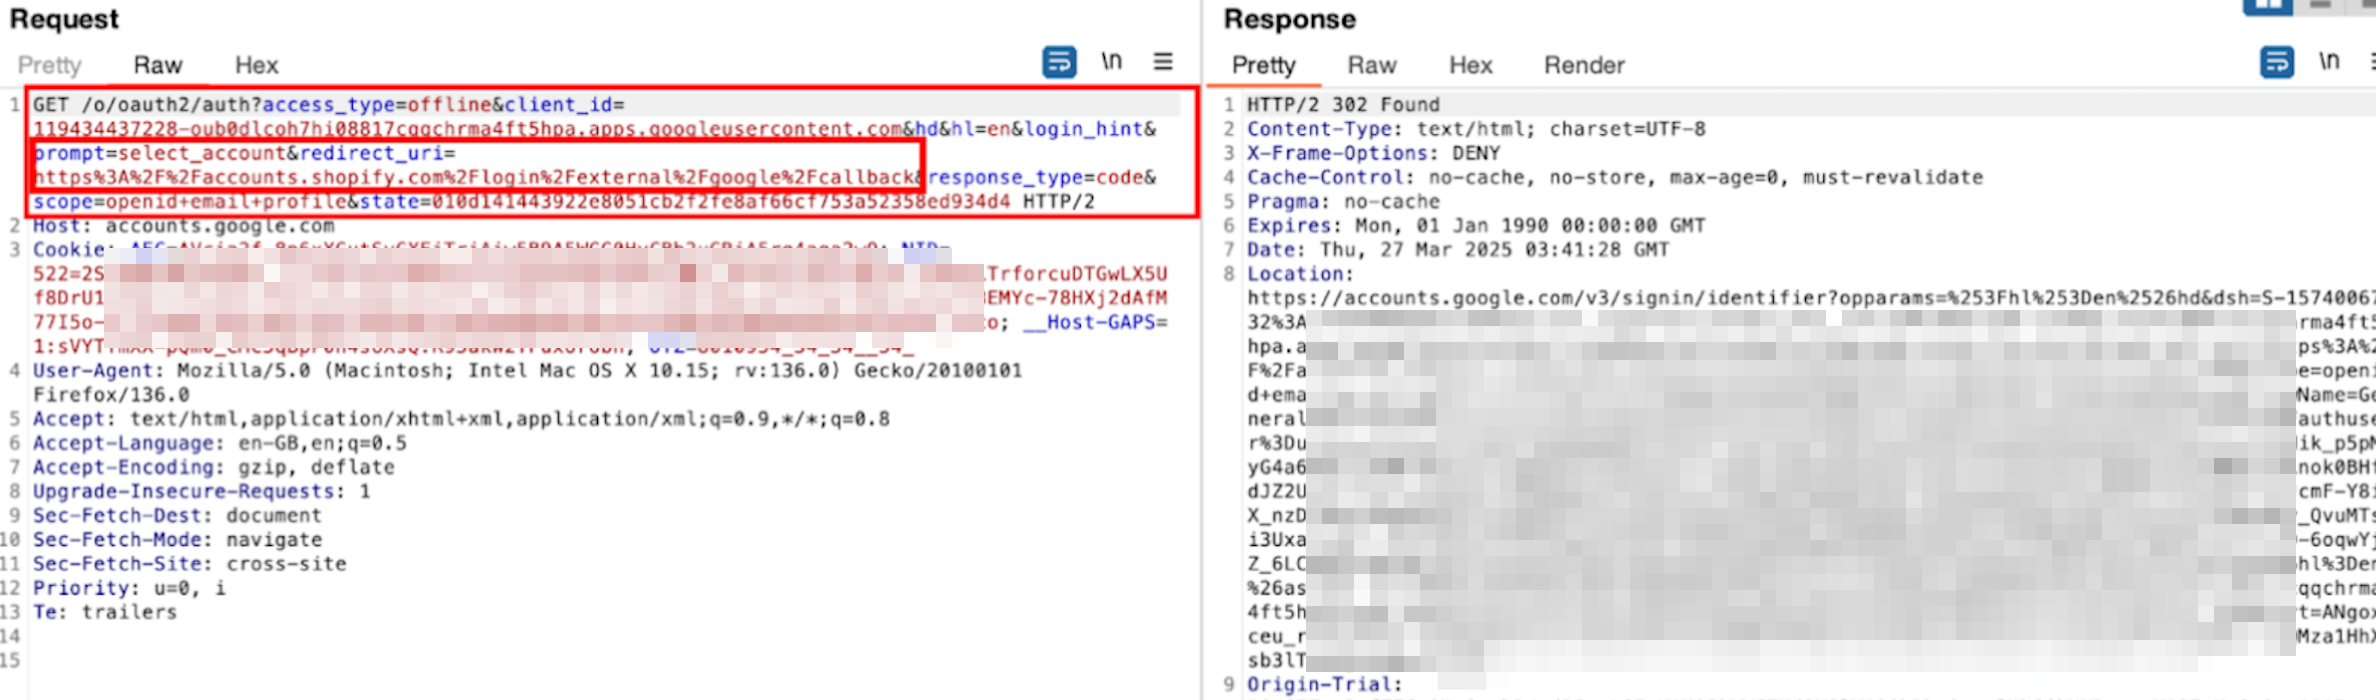
Let’s try signing up with a Google Account and capture the authorization request on Shopify.
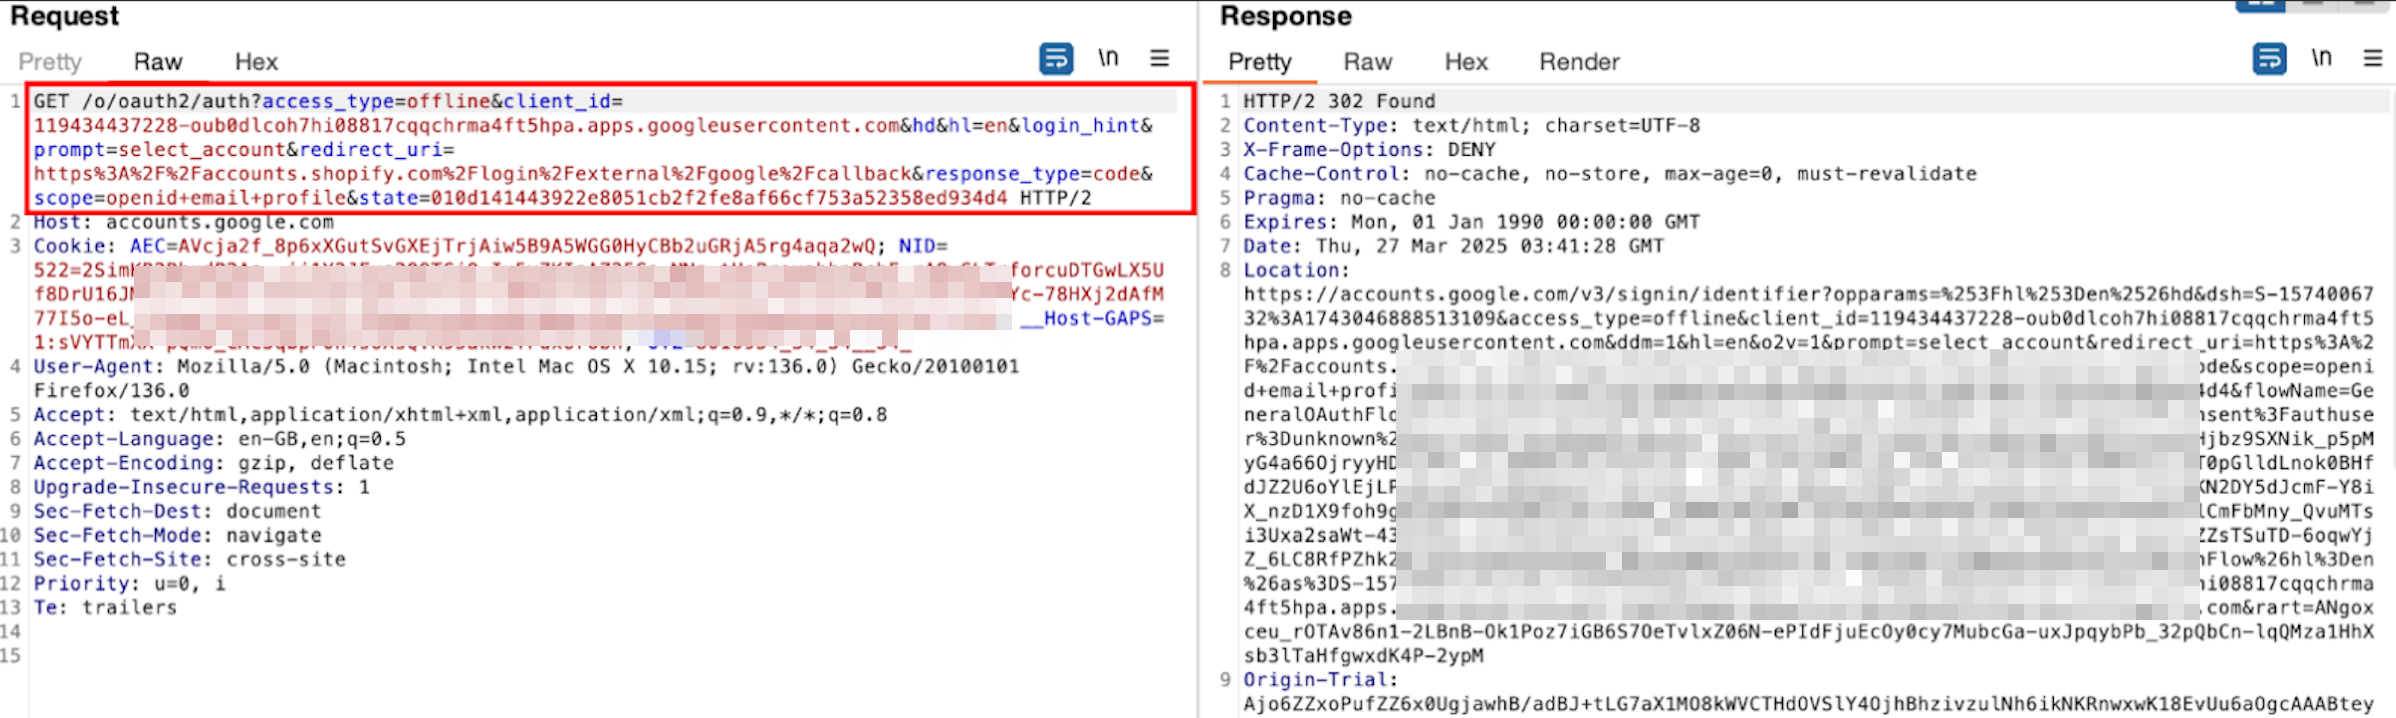
- client_id: The unique identifier assigned to the application (e.g., Shopify) by the OAuth provider (e.g., Google).
- response_type: Set to “code”, indicating that the authorization code flow is being used. On success, the application will receive an authorization code.
- state: A random, non-guessable string.
- redirect_uri: The callback URL where the user is redirected after authentication. The response will include values based on the grant type. In this case, the authorization code and state parameter will be attached to verify the request’s validity.
- scope: Specifies the requested permissions. Here, “openid”, “email”, and “profile” indicate that the application is requesting access to these details. The presence of “openid” confirms that OAuth is being used for authentication (via OpenID Connect).
- Other parameters: Some OAuth providers include additional parameters specific to their implementation.
- access_type: it determines whether the user must be logged in to access the data. When set to “online”, the OAuth provider issues short-lived tokens. If the app needs to function while the user is offline, it sets “offline”, which grants a refresh token to renew the session.
- prompt: Controls whether the user is asked for authorization again. For example, “consent” forces a re-authorization prompt, while “none” ensures no prompt appears if the user is already logged in.
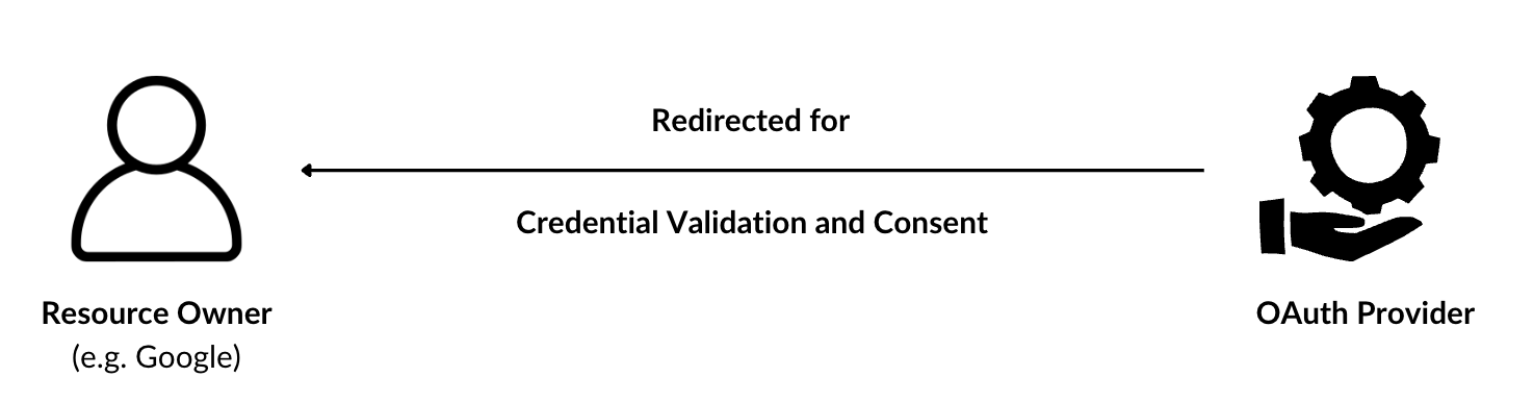
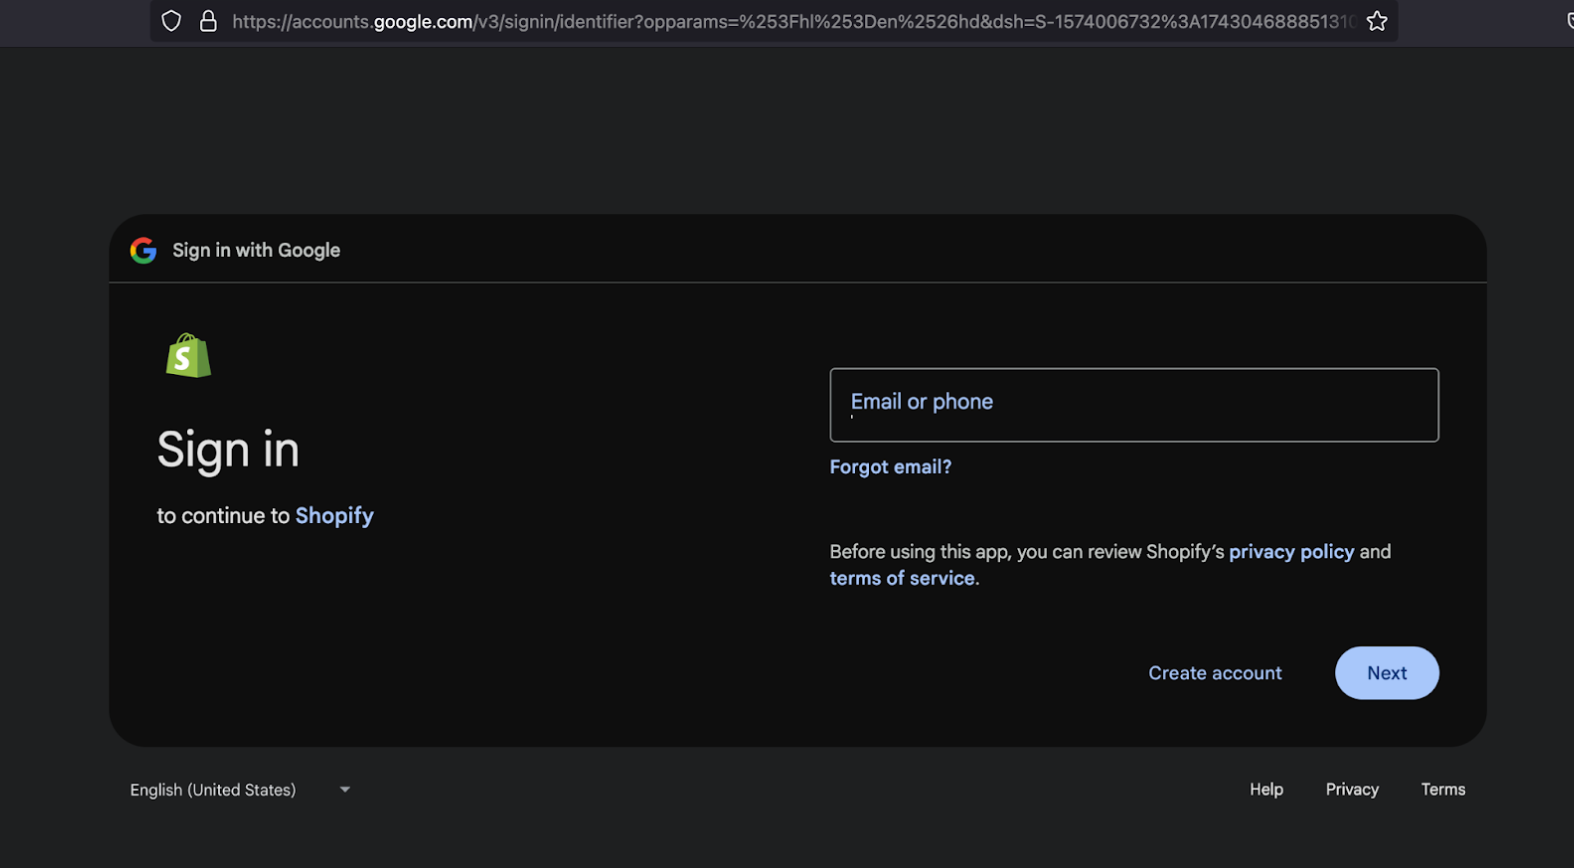
[2] Once this authorization request is sent to the OAuth provider, the user is redirected to the relevant service (e.g., Google) and prompted to enter their credentials. After validating the credentials, the provider asks for the user’s consent to share the requested information by SiteA.
[3] After the user grants consent, they are redirected to the URL specified in the redirect_uri parameter on the authorization request (step 1) and based on the grant type, parameters are attached on the call back.
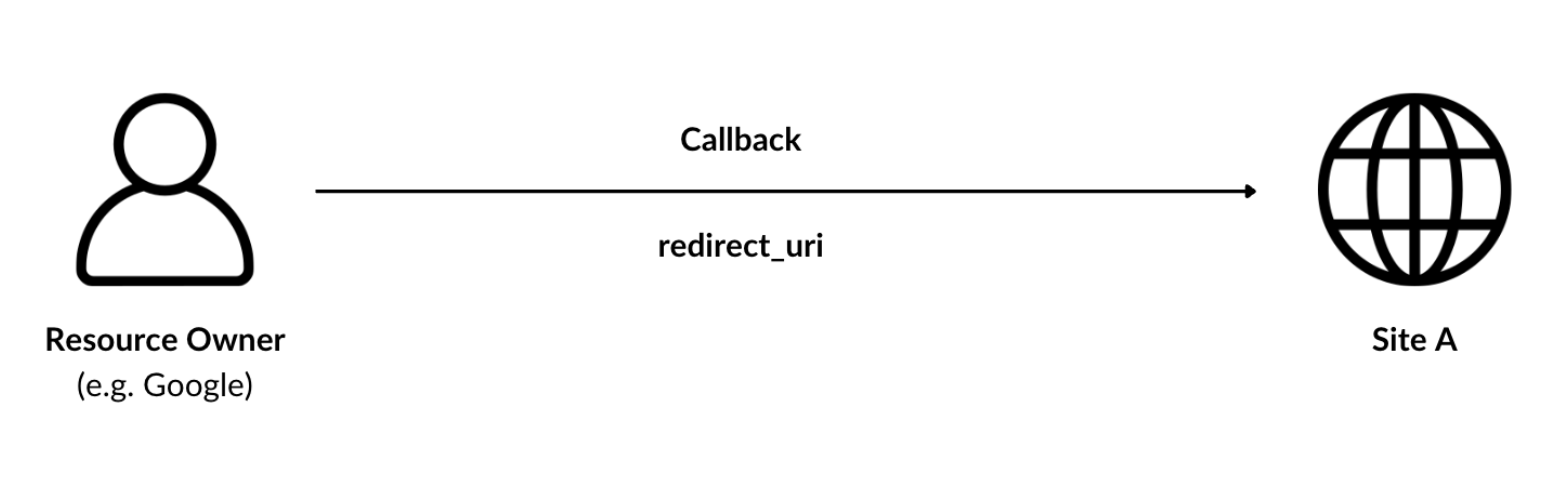
Referring to the callback request from “shopify”
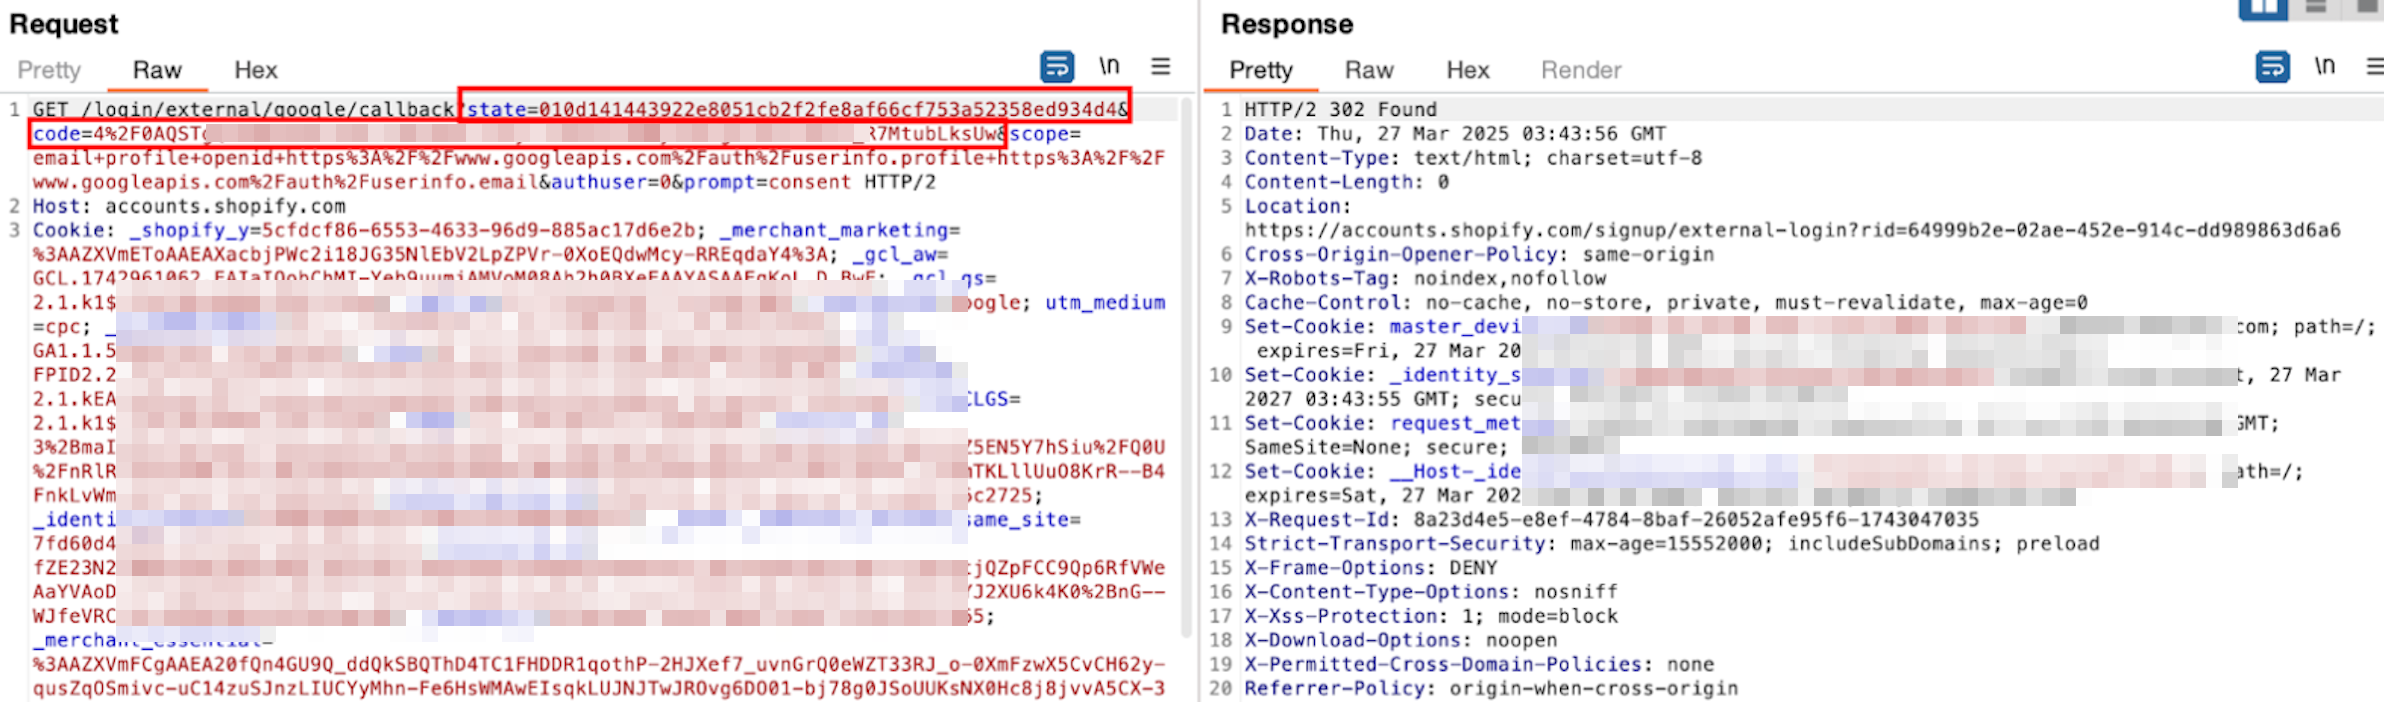
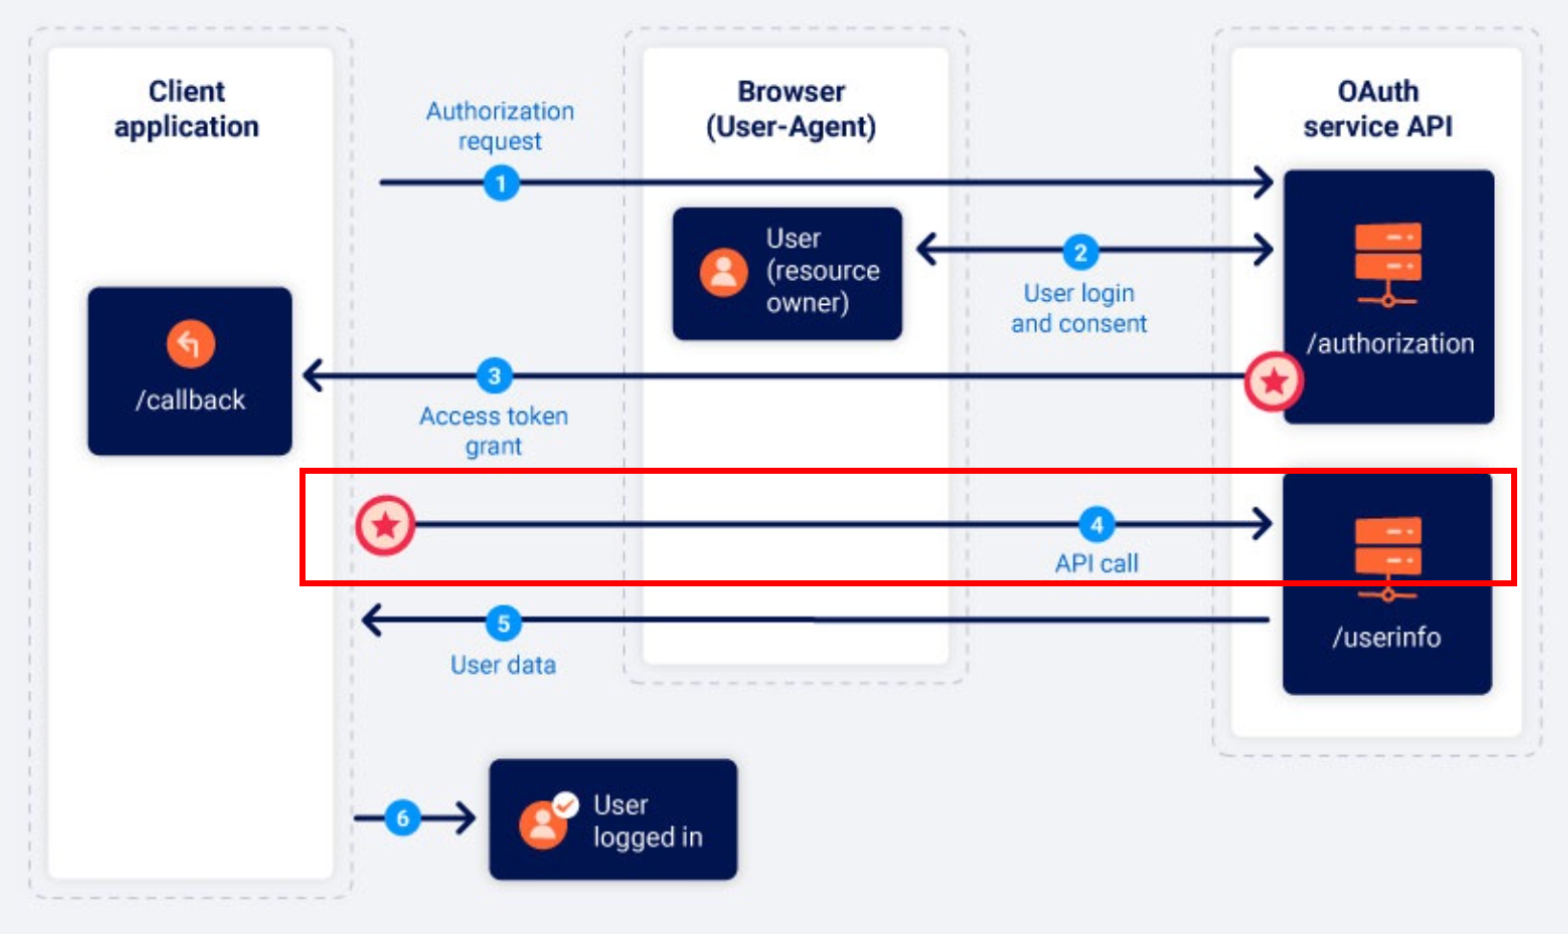
Now, Shopify has the authorization code, which it can use to request user information, and the state parameter to validate the request. At this point, most of the OAuth process is complete. From here, the communication shifts to a server-to-server exchange, where Shopify will use the authorization code to obtain an access token and retrieve the user’s data securely.
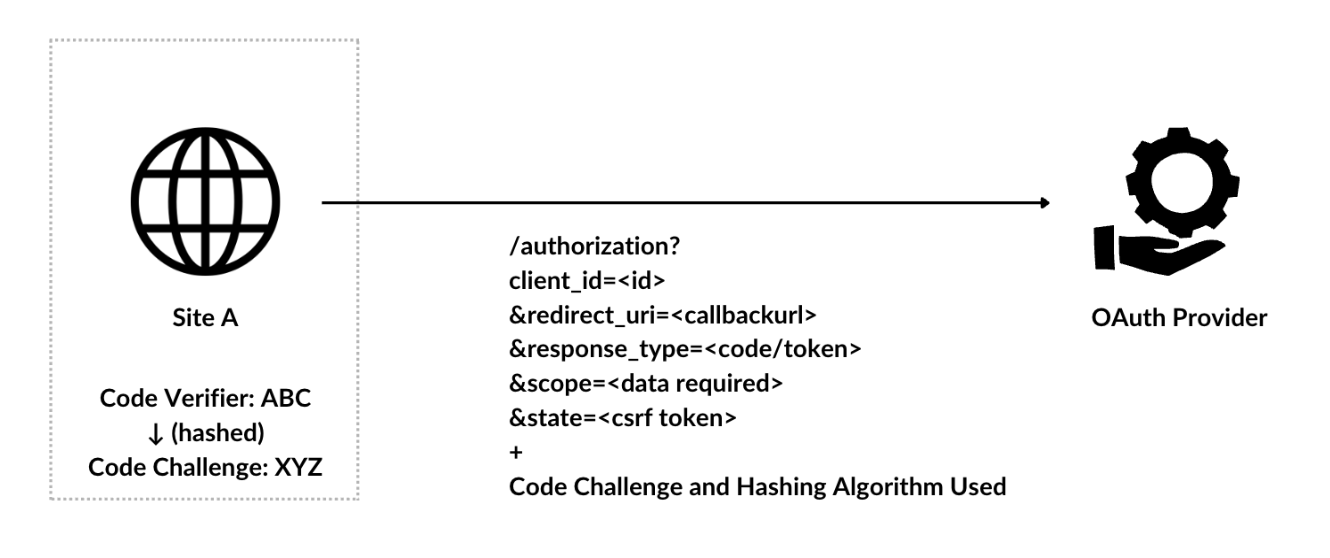
Let me perform a sanity check here. If you have understood the flow till now, the below diagram from portswigger should make sense to you.

Chapter 4:
More about the grant types
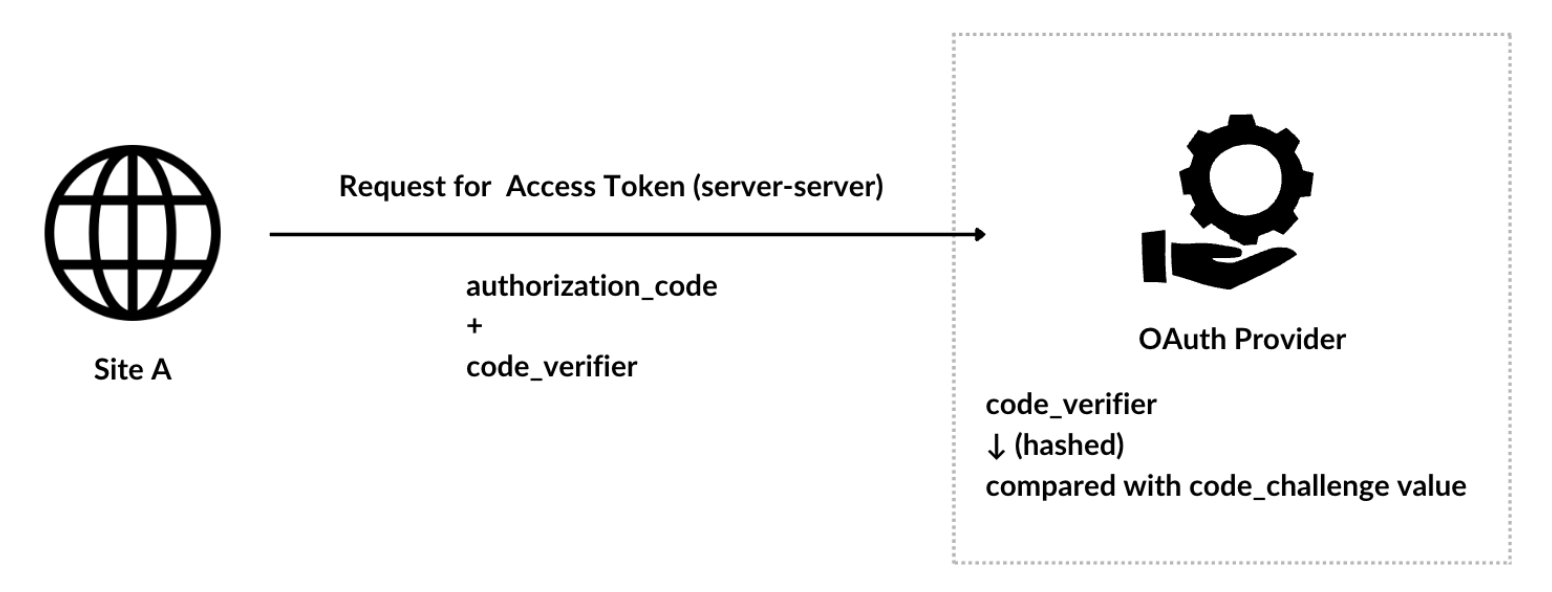
[1] Authorization Code (response_type=code) It’s the one we discussed above. There is an extended version of this flow called PKCE (Proof Key for Code Exchange), which is a more secure method. In PKCE, a random string (code verifier) is attached to the authorization request, and the OAuth provider saves this string. When requesting an access token, this string (or its transformed version, called the code challenge) is sent again to verify that the request is legitimate. This prevents attacks where an attacker intercepts and reuses the authorization code.
When the client wants the access token, it sends a request with the authorization code and also includes the code verifier. The server then uses the previously shared details to verify the code verifier before issuing the access token.
[2] Implicit Flow (reponse_type=token) The Implicit Flow is similar to the Authorization Code Flow, but instead of receiving an authorization code, the access token is directly issued to the client. This means there is no additional request to exchange a code for a token.
However, Implicit Flow is now discouraged for web applications due to security risks, such as token exposure in browser history or interception by malicious scripts. OAuth 2.1 officially deprecates it in favor of Authorization Code Flow with PKCE for security improvements.
Each OAuth provider may support different grant types based on their security policies and intended use cases. Additionally, the grant type keywords may vary, so it is essential to understand the flow thoroughly before performing any testing.
[3] Client Credentials The Client Credentials Flow is used for machine-to-machine (M2M) communication, where an application needs to access its own resources rather than a user’s data.
- The client (application) sends a request to the OAuth provider with its client_id and client_secret.
- If the credentials are valid, the OAuth provider returns an access token.
- The application can then use this access token to request its own protected resources.
This flow is commonly used for accessing API endpoints where authentication is required, but no user interaction is needed (e.g., fetching logs, managing internal services).
[4] Device Authorization (device_code) It is designed for devices that lack a browser or have limited input capabilities (e.g., smart TVs, IoT devices). Instead of requiring users to log in directly on the device, they are asked to authenticate on a separate device (such as a smartphone or computer).
- The device makes a request to the authorization server, receiving a device code and a user code.
- The user visits a provided URL on a separate device, enters the user code, and logs in.
- The device keeps polling the authorization server to check if authentication is complete.
- If the user completes authentication, the authorization server provides an access token to the device.
- Expected Server Responses:
- authorization_pending → The user has not yet completed authentication.
- slow_down → The client is polling too frequently; it should increase the interval between requests.
- authorization_denied → The user denied access or authentication failed.
- access_token → The user has authenticated successfully, and the device receives an access token.
[5] Refresh Token (refresh_token) A Refresh Token is used to obtain a new access token without requiring the user to log in again. This is useful when access tokens have a short lifespan for security reasons.
- When an access token expires, the client can send a request with the refresh token to the OAuth provider.
- If valid, a new access token (and sometimes a new refresh token) is issued.
Chapter 5:
Building the OAuth Penetration Test Cases
[1] Checking for the existence of the state parameter
- If missing, the application is vulnerable to CSRF (Cross-Site Request Forgery) attacks.
- How to check? As seen above on the shopify authorization request we see a query parameter “state” if that was not present, this attacks can be carried out

- Exploit: Send a request containing your own authorization code to the victim.
- Impact
- The victim unknowingly logs into your account and performs actions on your behalf.
- In some cases, the victim’s account gets linked to the attacker’s account, leading to account takeover (ATO) as the application blindly trusts the data from the oauth flow
- Examples
- https://hackerone.com/reports/111218
- https://hackerone.com/reports/1727221
[2] Tampering with Redirect URLs (OAuth Redirection Attack)
- The redirect_uri parameter determines where the OAuth provider sends the authorization code or access token after authentication.
- Exploit
- Tamper the redirect_uri parameter on the authorization request
- Impact
- If the application allows unvalidated or user-controlled redirect URIs, an attacker can manipulate this parameter to redirect the token/code to their own server
- Examples
- https://hackerone.com/reports/1861974
- https://hackerone.com/reports/55525
[3] Checking if the correct grant type is used in the application and analysing if that is the right choice (This is a best practice recommendation - Worth adding that on conclusion)

[4] Scope Manipulation (Upgraded Scope Attack)
- In Authorization Request, the scope is attached and sent initially. Those are the resources for which the consent is given. Since the existence of implicit grant types, the oauth server might trust the scope parameter blindly.
- Exploit
- On instances such as implicit grant type, After getting the access token and using it for fetching the user information, where scope parameter can again be sent where it needs to be modified to the one which wasn’t added on the authorization request.
- Impact
- Unauthorized access to sensitive user data.
- Remember: This is an issue with the oauth provider where the scope is not properly controlled and not with client application
- Reference
- https://blog.doyensec.com/2025/01/30/oauth-common-vulnerabilities.html (Scroll to Scope Upgrade Attack)
[5] Client Confusion Attack
- As per the oauth design, after getting the authorization code, the client application can ask for the access token but it has to attach the client id and secret and that is to verify only the authorized client are getting the access tokens
- Exploit
- On the access token request, tamper the client id with your client id and secret and try requesting for it.
- Remember: This is an issue with the oauth provider where the client ID is not properly verified and not with client application
- Reference
- https://blog.doyensec.com/2025/01/30/oauth-common-vulnerabilities.html (Scroll to Client Confusion Attack)
[6] Confusion Attacks
- This is specific to implementation level where if the client application is trusting a field that can have duplicate / repeated values across difference accounts
- Example test case:
- Normally sign up with a userA email address on the client application. On the attacker side, register a gmail account with userA email address.
- Then, sign up on the client application with google oauth and see if the login gets attached to the previously created account.
- Reference
- https://blog.doyensec.com/2025/01/30/oauth-common-vulnerabilities.html (Scroll to Mutable Claims Attack)
[7] SSRF on request_uri parameter
- On some of the application, request_uri parameter on the authorization request will be allowed / whitelisted, On those cases it can be used for SSRF attacks
- Exploit
- On the authorization request, add an additional parameter called request_uri with a loggable url such as burp collaborator to verify the vulnerability
- Impact
- Reaching the internal resources and the severity depends upon the cases on how the application behaves.
[8] OpenID Connect Attacks (yet to be added - checkout reference for now)
- Reference
- https://0xn3va.gitbook.io/cheat-sheets/web-application/oauth-2.0-vulnerabilities/openid-connect
Chapter 6:
Mitigation & Remediations
[1] Secure Authorization Requests
- Always use PKCE (Proof Key for Code Exchange) to prevent authorization code interception.
- Implement state and nonce parameters to prevent CSRF (Cross-Site Request Forgery) and replay attacks.
- Restrict redirect_uri to a predefined list to prevent open redirect vulnerabilities.
[2] Protect Access and Refresh Tokens
- Use short-lived access tokens and refresh tokens only when necessary.
- Encrypt or store tokens securely (e.g., not in local storage in browsers).
- Do not expose client secrets in frontend applications (e.g., mobile apps, JavaScript-based SPAs).
[3] Scope and Permissions Management
- Request only the minimum necessary scopes required for the application.
[4] User Consent and Transparency
- Clearly display requested scopes and permissions during authorization.
- Allow users to revoke access from their account settings.
[5] Information Trust
- On the critical functionalities, Oauth outputs are not to be blindly trusted rather there needs to be a client application verification before providing access to the resources.
Chapter 7:
Additional References
- https://web.archive.org/web/20170306105554/http://hueniverse.com/2010/05/15/introducing-oauth-2-0/
- https://portswigger.net/web-security/oauth
- https://oauth.net/2/
- https://oauth.net/2.1/
- https://frontegg.com/blog/oauth-grant-types
- https://portswigger.net/research/hidden-oauth-attack-vectors
- https://portswigger.net/web-security/oauth/openid/lab-oauth-ssrf-via-openid-dynamic-client-registration
Chapter 8:
Practice Labs
- https://portswigger.net/web-security/all-labs#oauth-authentication
- https://github.com/cyllective/oauth-labs/
- https://github.com/koenbuyens/Vulnerable-OAuth-2.0-Applications/blob/master/insecureapplication/README.md
Timeline:
[Apr, 2025] - I’m not quite sure when I gathered the exact dates, but I’ve made sure to provide content that’s well worth your time—thank you for reading!